Christmas is around the corner and that includes gift giving time! Everyone has a hard to buy for person on their list, or that someone who can buy anything they want. So this year, I’m doing a little DIY with my gift giving. Handmade gifts used to have a negative feel about them, but let’s all give a big round of applause to Pinterest for changing that thought process. I personally love DIY gifts. It takes thought and time and generally you end up with something super cool that just can’t be bought in a store. Don’t get me wrong. A gift is a gift. Plenty of people have no desire to DIY something. Nothing wrong with that. But if you’re into DIY, come along and check out my DIY calendar I made for the Handmade Holidays Blog Hop.
 I’m excited to be part of this Blog Hop hosted by Jennifer Priest of Smart Fun DIY – Be sure to check out all of the other great handmade gifts at the end of this post! Grab some inspiration for your own DIY gifts this year!
I’d like to thank Walnut Hollow for providing me with the Creative Woodburner Tool. This is completely new to me and I was so excited to try this technique. I have an odd thing for clocks and calendars. I saw a vintage perpetual calendar in an antique store recently and of course, that was the one item that wasn’t for sale! So I thought I’d make my own to give away this Christmas. So here’s what you need:
Supplies for DIY Calendar
- Creative Woodburner Tool from Walnut Hollow
- Wood squares, scraps, or whatever you want to use for letters/numbers – I needed 6 for the months ( I used front and back for these) and 12 for the days so 18 total – similar ones found here
- Wood plaque, metal stand, or anything else you can use to hold your calendar
- Stencils
- Nails
- Stain or paint – I used this one
- Stickers (optional)
I wanted this one to have the months and the days so I found several small wooden tag pieces that already had holes in the top.
Here’s my stash I started with:

I didn’t initially like the shape of my wood plaque so I cut the decorative top off with a saw. I stained the wood plaque with my favorite stain and then it was time to do the wood pieces. I left them in their natural state first to see what it would look like with the wood burning tool. I also tried it on painted wood, but didn’t love the result.
Helpful hints –
- If you’re a newbie to wood burning like me, buy a few extra pieces so you can test drive it first. I needed quite a few tries to get the hang of it.
- I lightly painted one of my wood pieces to see if I liked it better than the natural wood tone. The tool got paint on the end of it and didn’t burn as well. Told you I was a beginner! If you can, leave it natural wood.
- It takes practice. Mine aren’t perfect. However, that’s part of the joy of DIY – it doesn’t have to be perfect and you’ll be proud of yourself for doing it!
DIY Steps
- Stain or paint your calendar stand
- Stencil the letters or numbers you’re going to be burning (unless you have a fabulously steady and accurate hand – which I do not!)
- Use the wood burning tool to trace over all your numbers. For a monthly calendar, you’ll need 12 numbers (1 zero, 2 ones, 2 twos, and then one each of 3-9)
- Add stickers for the months (I used front and back of each wood piece to save space. I chose stickers for these because my stencils I had on hand were too large for the wood pieces. If you don’t love the sticker look, make sure to get the right sized stencils.
- Measure the width of your calendar stand and then add 3 nails evenly spaced to hold your numbers and months
- Add your fancy new wood burned months and days and that’s it!
[one_half]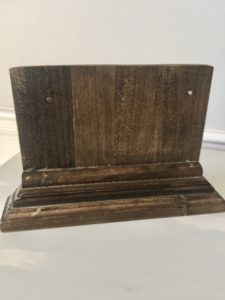 [/one_half][one_half_last]
 [/one_half_last]


Now Give it Away!
Wrap it up pretty and give someone your handmade DIY calendar! I have to say that I’m intrigued with the wood burning technique. It’s such a pretty, rustic look and I’m excited to give it another try again. Thanks to Walnut Hollow for providing me with the supplies for this project! And a big thanks to all the generous sponsors for this Blog Hop event:

Pin for later!

Check out all the other talented DIY’ers and their gifts and enter to win some fabulous prizes!
a Rafflecopter giveaway

Marta Rice
Thursday 23rd of November 2017
Wonderful idea! I love the vintage items and this could be a great addition to my collection. Thank you for sharing this project with us.
Melissa
Monday 27th of November 2017
Thanks so much Marta!
Rebecca Allen
Saturday 18th of November 2017
What a lovely calendar. It would look elegant on any desk.
Melissa
Monday 20th of November 2017
Thank you Rebecca! I'm hooked on the wood burning now!
Kristi
Wednesday 8th of November 2017
Oh my gosh! SUCH a brilliant idea! LOVE it!
Melissa
Thursday 9th of November 2017
Thanks friend! It was a bit of a challenge at first, but I'm definitely going to try more wood burning!
Emy
Wednesday 8th of November 2017
Love this calendar! I need to try wood burning!
Melissa
Thursday 9th of November 2017
Thanks Emy! You should definitely try it!!
Victoria Banaszak
Wednesday 8th of November 2017
This is a cool calendar. I think if you want to add paint, wait till after you do the wood burning. Then water down the paint and put it on with a sponge brush like a stain and it will soak into the raw wood.
Melissa
Thursday 9th of November 2017
Thanks Victoria! What a great idea - I'll certainly try that helpful tip for next time!