
If you have cinder block walls in your garage or basement, read these tips for how to install vinyl wall base! Complete with a list of tools, step-by-step pictures, and tips for an easy installation.
Our basement laundry area was bare, gray cinder blocks when we bought the house, and it was depressing to go down there every time we had to do laundry.
So we decided to redo the cinder block basement (on a budget!) by sprucing up the concrete floor, painting the cinder block walls, and of course—installing a nice wall base trim to bring it all together and give the area a more “finished” look.
More budget-friendly home DIYs: How to Remodel a Kitchen
Why use vinyl wall base for cinder block walls
We chose vinyl wall base for our cinder block walls for several reasons:
- Easy installation, not requiring any nailing into cinder block or concrete.
- Inexpensive trim that is easy to DIY without any special tools—no saw, no power nail tools needed.
- No painting required.
- Vinyl wall base is flexible. This was super important for us because our cinder block walls were not perfectly smooth, so a solid PVC molding would not be ideal.
- Waterproof. This is a laundry area in a basement, after all.
Related post: Kitchen Remodel Cost Breakdown
Before getting started
Here’s what you should to before you get started:
- Make sure that your floor and walls are finished/painted how you like. It’s just so much easier to paint BEFORE your trim is installed so you don’t have to worry about clean lines. We debated for a long time whether to paint our concrete floors, put epoxy down, or add actual flooring. We went with vinyl floor planks and are so happy with how warm and homey they makes the space look!
- Measure your walls so you don’t have to join 2 pieces of wall base in the middle of a wall. If you can avoid a seam from joining 2 separate rolls of wall base in the middle of your wall, it will look nicer.
- Plan to work from left to right (or however your roll of wall base is rolled up). Because of the way our roll of wall base was rolled up, it was much easier to work from left to right, unrolling it as we worked. If you really need to, you can unroll and cut enough for your whole wall, straighten it out, and work from right to left, but that’s an extra step.
- Move everything away from the wall and give yourself a couple of feet of room to crouch as you install the wall base. If that’s not possible, you can definitely do the installation in small sections if you don’t have room to move EVERYTHING away from the wall.
- Plan for a 2-day job. One day to install the wall base, the other to caulk on top of it, giving the adhesive time to dry.
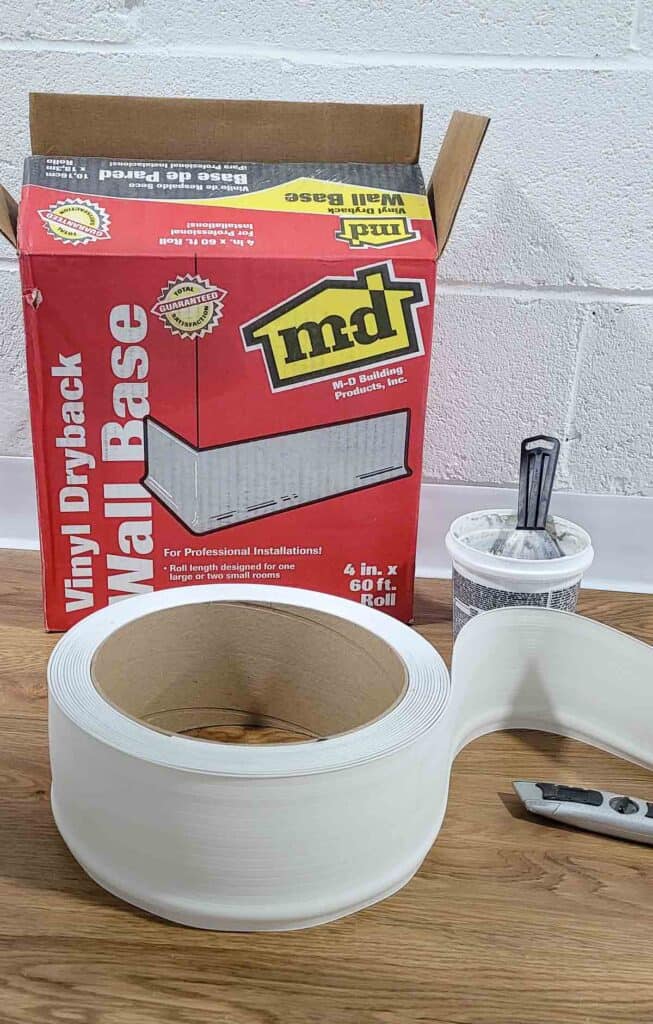
Supplies
For this project, you’ll need:
- Vinyl floor base (we used this 4-inch one. I highly recommend going with 4-inch wide trim instead of 2-3 inch trim because the wider trim just gives it a more elegant look and covers more imperfections at the bottom of the cinder blocks.)
- Adhesive (we used this Cove Base Adhesive in white. We needed a couple of tubs for about 120 feet of wall. The amount you need will depend on how uneven your cinder block wall is. If it’s really smooth, you’ll use less. If it’s really uneven, you’ll use more.)
- Adhesive spreader tool (we got this 3-inch one that was just a little smaller than the width of the floor base, which made for super easy spreading)
- Nitrile gloves
- Box cutter or utility knife
- Strong scissors or shears
- Caulk and caulk gun (we used all-purpose acrylic latex caulk)
- Wet sponge to wipe the extra caulk off
- Measuring tape (this is actually OPTIONAL! I loved how easy this project was because it didn’t require ANY accurate measuring. You can just press the wall base against the wall to see how much you need, add a few extra inches “just in case,” and cut. Then as you get to the corner, you can trim off any excess before gluing it down.)
Related post: DIY Accent Walls
How to install vinyl wall base
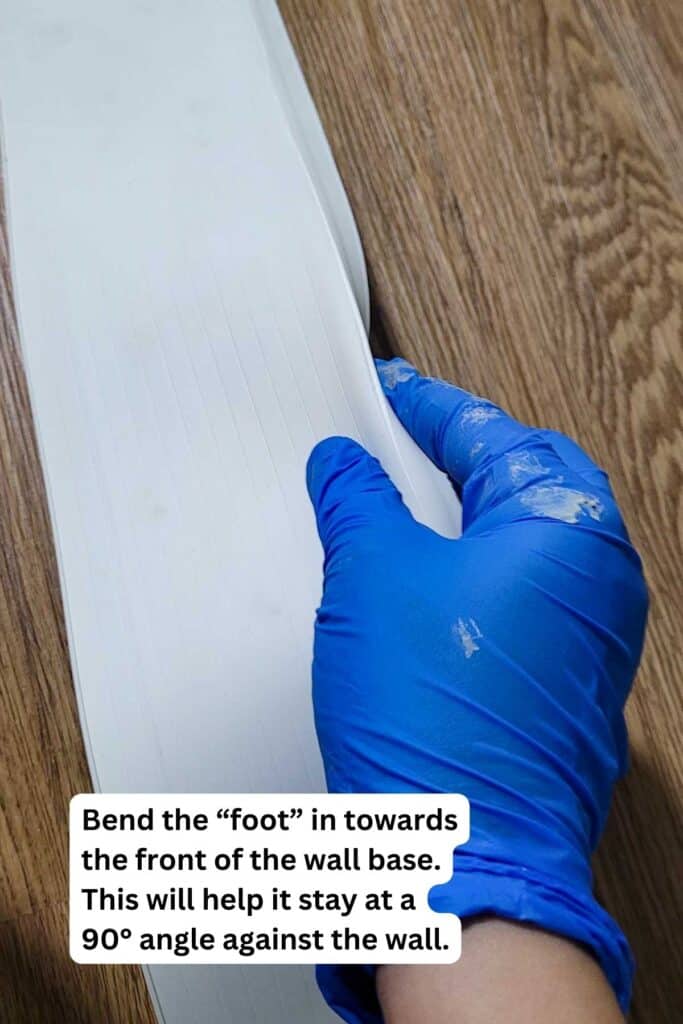
How to add the little “foot” at the bottom to cover the gap between installed floors and the wall: You’ll see that the trim itself is pretty flat, and the little “foot” does not stay when you try to bend it. There’s an easy fix for this!
Turn the vinyl wall base pretty side down. Use your box cutter to score lengthwise in one of the pre-scored grooves where you want the “foot” of the wall base to bend. It’ll take a few tries to get the pressure right. You definitely want to cut halfway through the vinyl but be careful not to cut all the way through.

Roll out and score several feet at a time so you don’t have to stop to do this every few feet.
Use your hands to bend the “foot” in all the way towards the outside of the vinyl (towards the pretty side) to make it more flexible for bending into a 90-degree angle.
Related post: How to Paint Bathroom Tile Floor
Put on gloves.
Use the adhesive spreader tool to grab a bunch of adhesive and start spreading it on the back of the wide part of the wall base. Work on 2-3 feet at a time. Do not apply it to the little “foot” section. Spread the adhesive with the tool, making sure to get it close to the top edge but not all the way at the edge. If you’re applying it to cinder blocks, you’ll need a thick-ish layer of adhesive because the wall is uneven and the adhesive will fill in any gaps. If you’re applying the wall base to a smooth concrete wall or to dry wall, you’ll need much a thinner layer so the excess doesn’t come out on top.
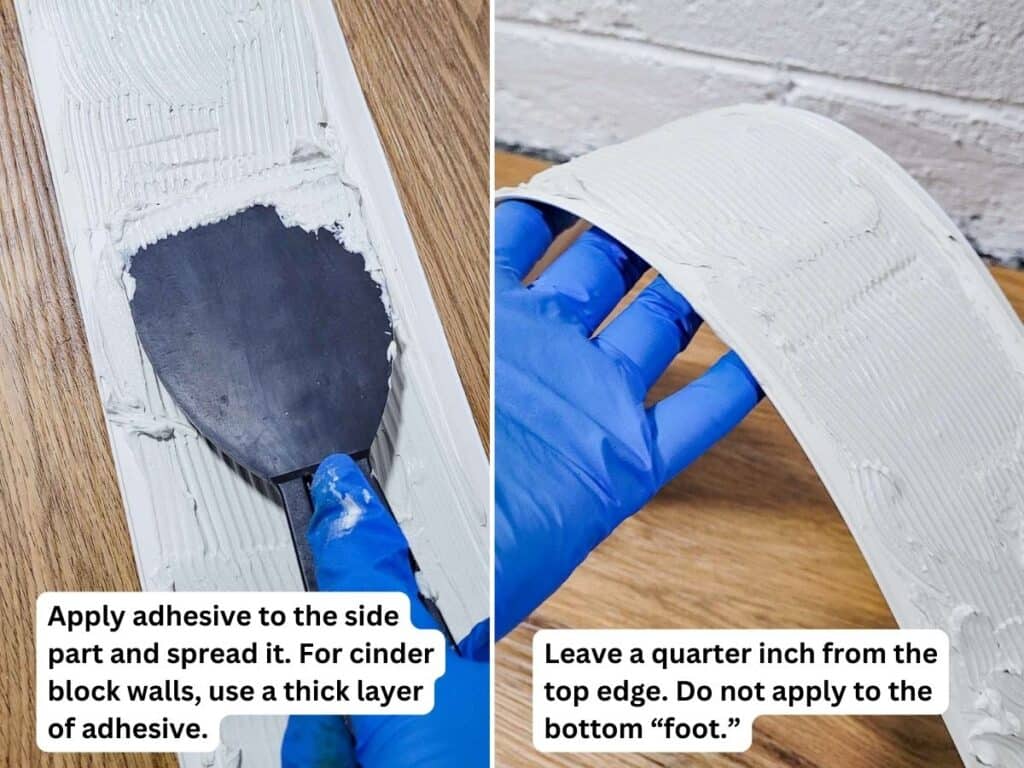
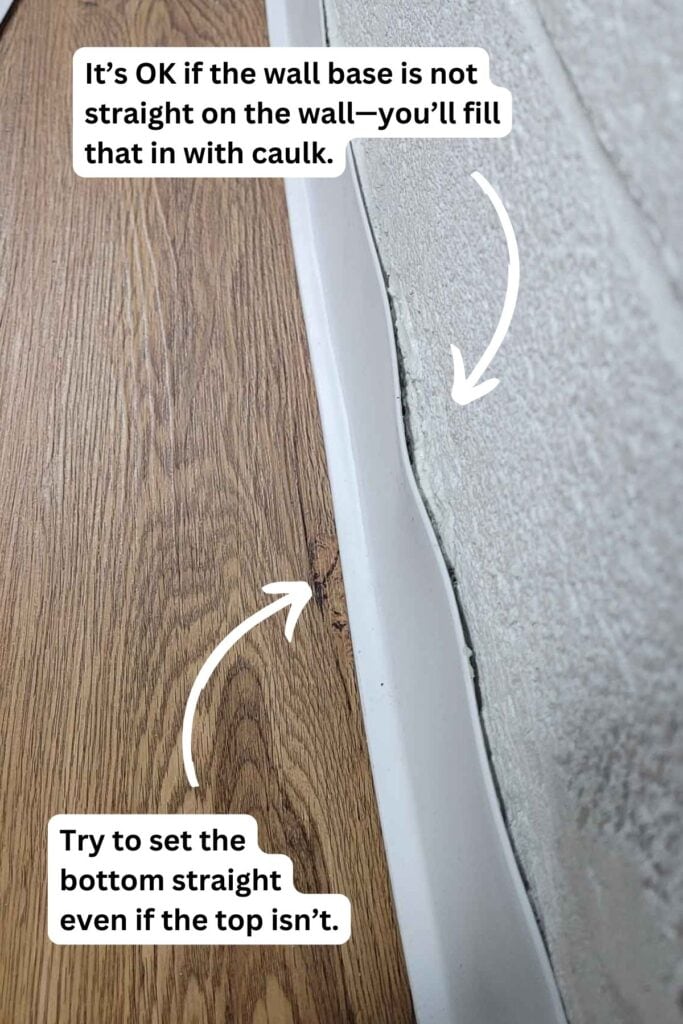
Carefully apply the wall base to the wall, making sure to put it low enough to bend the “foot” against the floor. If it is too high, the foot will unbend. Press gently with your hands, squishing the adhesive around to get it closer to the top edge. It’s OK if there is a gap for now, you will caulk that later!
Continue applying adhesive 1-2 feet at a time and gluing it on.
When you get close to the corner, roll out enough wall base to be 100% sure you will reach the corner, plus another inch or so just in case if you’re not using a tape measure. Cut off the extra wall base with scissors.
When you get to the corner, use your hands to press the wall base all the way to the corner, then use a pencil or a box cutter to mark where you’ll cut the wall base so it ends exactly in the corner.
How to install wall base in a corner
If you reached an inside corner, you’ll need to cut the “feet” or the two adjoining wall base pieces at a 45 degree angle so that they meet when you put the two pieces of wall base next to each other at 90 degrees. You can do this with scissors.
How to install wall base around an outside corner
If you’ve reached an outside corner, you can simply cut the wall base at 90 degrees. There will be a gap in the “feet” of the two adjoining pieces, but you can fill that in with white calk.
Caulking around vinyl wall base
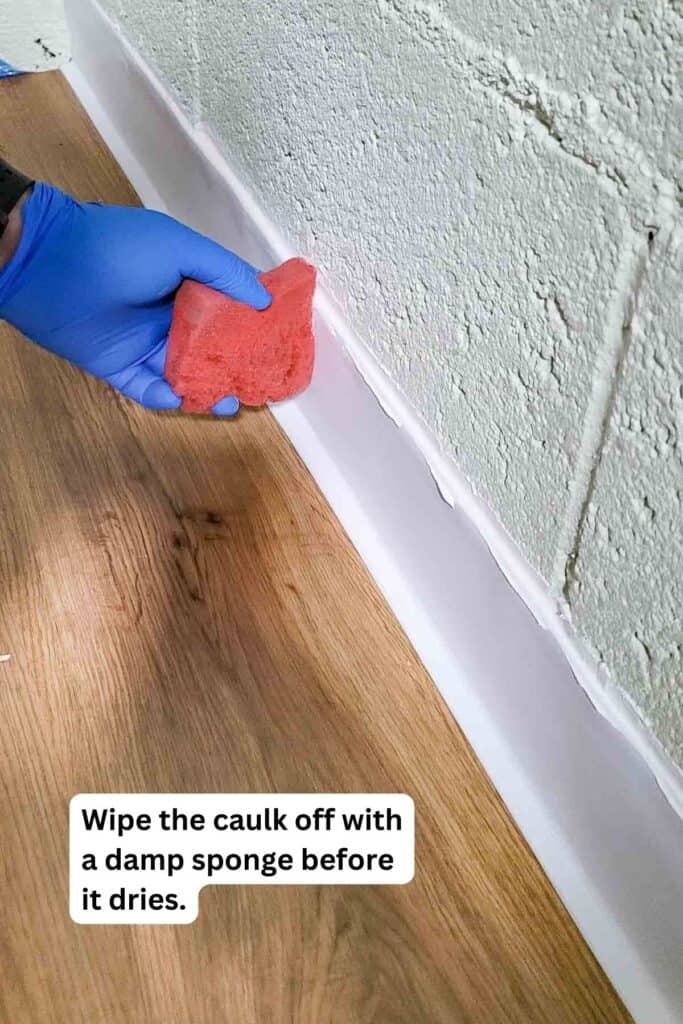
Give the wall base adhesive at least a day to dry before caulking. It won’t be fully dry by then, but that’s OK.
Apply caulk to the gap between the wall base and the wall, and use a wet sponge to wipe off the excess.
Apply caulk to any seams between 2 pieces of wall base.
You’re done! Enjoy the fresh new look of your wall and plan your next project!
Related post: DIY Board and Batten Accent Wall
Be sure to SAVE this post on Pinterest so you can find it when you need it:
