A DIY board and batten accent wall is an affordable DIY project that won’t require much money or skills. It can add personality to an otherwise boring wall. There are so many variations on a project like this from how high you make it, how far spaced, paint color, etc. Check our DIY board and batten tutorial here!
If you want to add a bit of character to your home, but don’t want to spend weeks or tons of money, a DIY board and batten accent wall may be the perfect solution. Another benefit is board and batten isn’t super trendy – it’ll likely appeal to you for years to come.
Personally, our DIY board and batten was a bit challenging, to say the least, but that had nothing to do with the actual board and batten. In fact, ours was a pretty dramatic project and not in a good way.
Just to clarify – I love the board and batten and I’d do it again in a second. Installing board and batten in your home is an amazing way to add character for very little money. (unless of course, you’re us, I’ll tell you why shortly).
I’ll start by saying this was by far the worst project we’ve ever done. And it’s not because of the board and batten. That part was easy. Measure, cut, liquid nails or nails, paint, and done. This project is topping my list for the poorest planning on our part. Also, this one wins for “if something can go wrong”. Because it did go horribly wrong.
DIY Board and Batten Accent Wall
So I lost the battle for the TV above the fireplace. We’ve lived in our house for almost 6 years so I’d say I put up a pretty good fight. That’s not entirely true. Part of it is because we had a TV that worked. People were amazed we only had one TV. We don’t really watch much TV and we weren’t about to go in debt over a TV.
But, it’s been on my husband’s list for years. Pretty much since we moved in. But you know how life goes. There’s always something you need money for other than a TV.
Finally, we saved up the money for the TV project. We’ve been married 14 years. We operate with a give and take kind of rule. If each person gets a win out of the situation, then it’s just better all the way around.
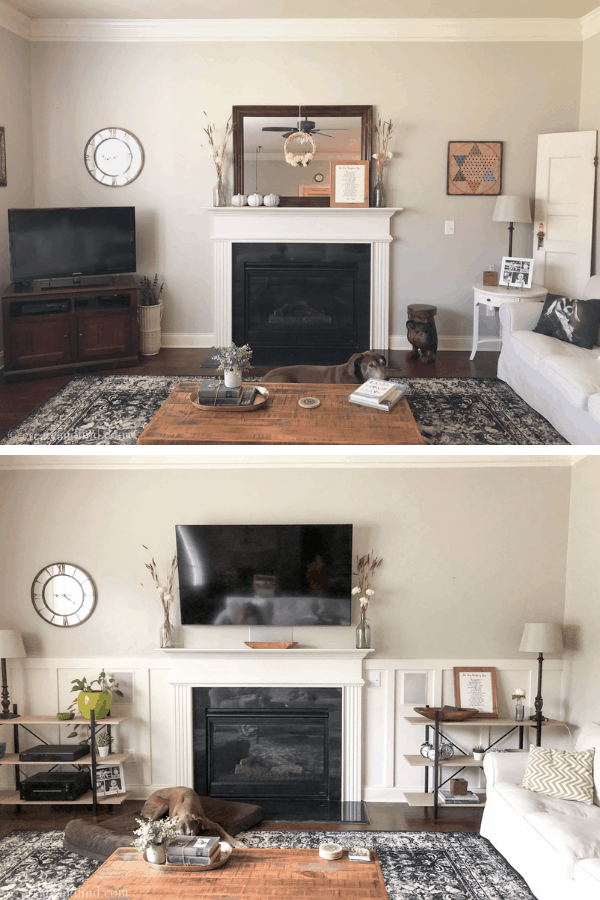
Here’s the before wall:
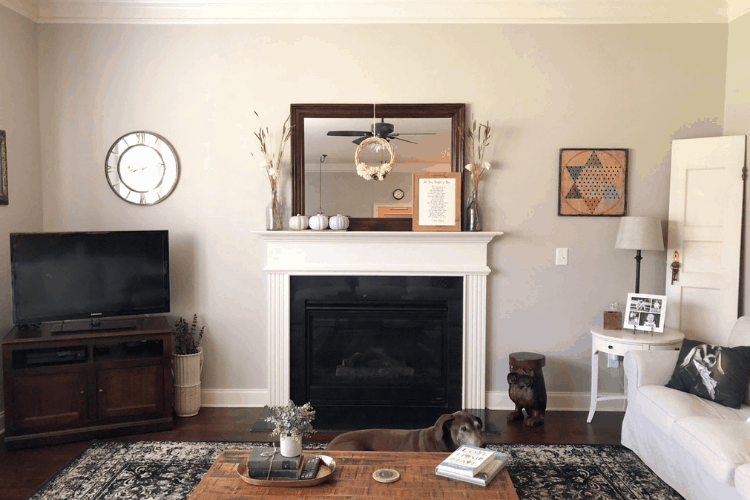
But what to do with the walls?
My Big Dilemma
So my big dilemma was what to do with the walls. I knew I didn’t want just a blank wall with a TV. But.
There’s a sneaky thing called a budget.
I couldn’t afford built-ins, nor did we have the time to do them. I also couldn’t afford expensive furniture to use for shelving to hold the necessary TV components.
And he agreed that we didn’t need just a giant blank wall with a massive TV. Well, not really agreed. But he saw my side too and originally we planned on shiplap, but then I changed my mind and decided on board and batten. For one, it would be easier, quicker, and cheaper. We installed a DIY shiplap wall in our bedroom (which I still love) a few years ago, but it was a lot of work.
And a total aside to this project is the idea that you should do what you love. My shiplap project was featured on a pretty big site once and I had lots of “what if you change your mind” and “shiplap will fade quickly” comments. So what! If you love it, then do it. It’s your home and you should love it.
DIY Board and Batten Project – The Worst Project Ever
So why was it awful? It’s easy and cheap. What could go wrong? Ha! Let’s see. We (and I say “we” lightly) thought this would get done in about 3 days. Idiots. That’s what we were. The biggest idiot move was that we started the week of Thanksgiving. It was the first chance my husband had to work on it after being so busy at work. But I was working most of that week and did I mention that we always host Thanksgiving dinner for about 15 people? Oh, and the kids were out of school all week.
Do you see a pattern of signs here that we never should’ve attempted a project like this during this time?
And no need to mention in the comments how dumb this was – I already know.
So let me explain. This wasn’t a simple project that meant installing the TV and putting up board and batten. No way. My husband had been saving his birthday money and Christmas money for years (yep, I said years) to buy a surround system. We’re talking in-wall speakers, a center channel (wth is that) and ceiling speakers. And he’s doing all the wiring himself which he’s perfectly capable of doing.
He’s a perfectionist and wants things the way he wants them. And generally, I appreciate that. He’s crazy handy with anything and it’s always done to a T. He even makes sure the screws in outlet covers and light switches are turned the same way. Those little lines are all vertical. I thought this was the strangest thing when I first saw him do that.
What Went Wrong
Let me count the ways.
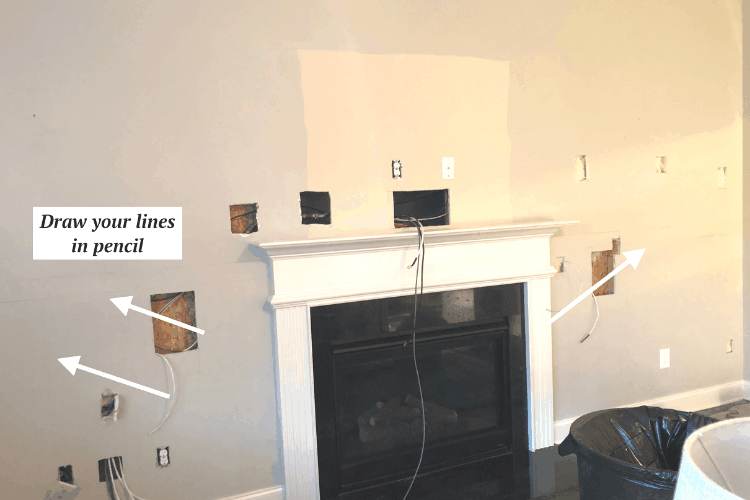
First, he started with cutting massive holes in the walls for the in-wall speakers. Ok. I can handle that until I see the speaker covers are gray or tan or some color that will stick out like a sore thumb. So he attempts to paint them. Have you ever put paint on a cover that has a million tiny holes? He spent lots of time in the garage with a toothpick poking through the holes.
Next. The paint on the covers sucks, but it’ll do. He moves on to pulling the wires through to all the different parts. Now I wish I could give you a clue as to what he did. But this is way beyond my scope of even wanting to learn. Wires, speakers, cutting into walls. Not my thing. But, he got a few wires pulled for some, but needed to get through behind the fireplace for the center channel.
Here’s where disaster strikes.
It’s on Tuesday before Thanksgiving. I have one day off so I’ve invited a friend over for each kid and we’ve got a fun day planned. We’re heading downtown to eat lunch at a cool local place. We’re fortunate to live right outside the campus of UGA. It’s a beautiful space and tons of places for kids to run around. Plus, the students were on a break so it was quite empty. So we were going to spend some time playing. If you’re lucky enough to live around a major campus, take advantage of it!
I’ve got one extra kid here and the 2nd mom is in the middle of dropping off the other kid. All of a sudden I hear my husband yelling “Get out, get out of the house”. We scramble out the door and he follows. I can smell the overwhelming fumes of gas. Yep. In the middle of his cutting through the wall, he cut the pipe that leads to our gas fireplace.
So I’ve got to explain to this mom that I barely know that yes, her child will be safe. No, we don’t normally spew gas fumes onto children. And did I mention that it’s Tuesday before a major holiday? Now we’ve got to find someone to come out on an emergency service call so we can have a safe place to live.
Long story short. I take off with the kids. We stay gone all day. Then we find an emergency plumber to come out the next day. Unfortunately, he had to cut out the pieces that the hubs had already patched, so that put him even farther behind.
So now that our house is safe again, he can get back to work. After we host 15 peeps for turkey day.
Moral of the story. Plan for things taking longer than expected when doing DIY projects and avoid major holidays! Oh, and gas lines.
This is what ole Charlie dog thought about this project!

Back to the DIY Board and Batten!
This is really one of the easiest projects to do that doesn’t cost much money and ordinarily doesn’t take much time. However. I wish I had been there to help pick out our materials. He bought MDF that was too thick for what I wanted. And since I was working so much, they got cut and installed before I could fix it. It’s not perfect and one day, maybe we’ll change it.
Just know that we didn’t take off our baseboards. If I would’ve known how much of an eyesore it would be, I would’ve voted for taking them off. But again. It’s not a huge deal and I can live with it for now.
Board and batten has tons of variations in styles, measurements, and placement on the wall. There’s no wrong way to do it. You just need to figure out how you want your wall to look. I just wanted simple strips vertically with one horizontal board at the top. And I only wanted to go up about 1/3 of the wall.
Supplies for Board and Batten
- liquid nails
- MDF or other wood that you can buy or cut into strips. I highly recommend MDF so you don’t have the issue of it sticking out over your baseboards – our mistake was getting 1″ thick MDF – go for the 1/2″ so it won’t stick out like a sore thumb!
- paint
- caulk
- saw
- level
It helps to draw your plan on the wall first. My hubs drew with a pencil and measured to get his spacing correct. This is all personal preference. You may want more strips or less, depending on the size of your wall.
Steps for DIY Board and Batten Accent Wall
- measure your wall and determine how many strips of wood you want on the wall
- he measured from the center of the fireplace and then decided how many strips we needed
- draw your plan on the wall in pencil – it’ll get painted so this won’t matter in the long run. Just don’t draw too dark.
- cut the MDF or other wood to your desired length
- apply liquid nails to each strip and be sure and check your level a million times before adhering to the wall
- if you want added stability, you can also use a nail gun to and nail each strip to the wall. You’ll need to make sure you’re nailing into a stud though
- caulk the seams where the vertical strips meet the horizontal strip at the top
- use spackle to fill in any nail holes (if you used nails in addition to liquid nails)
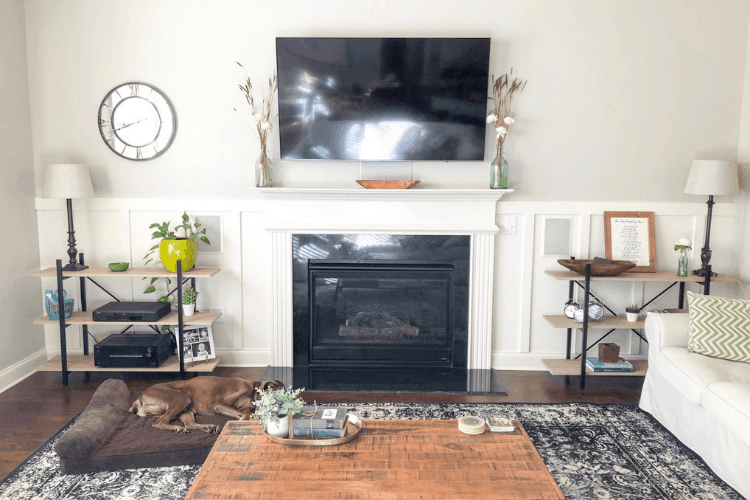
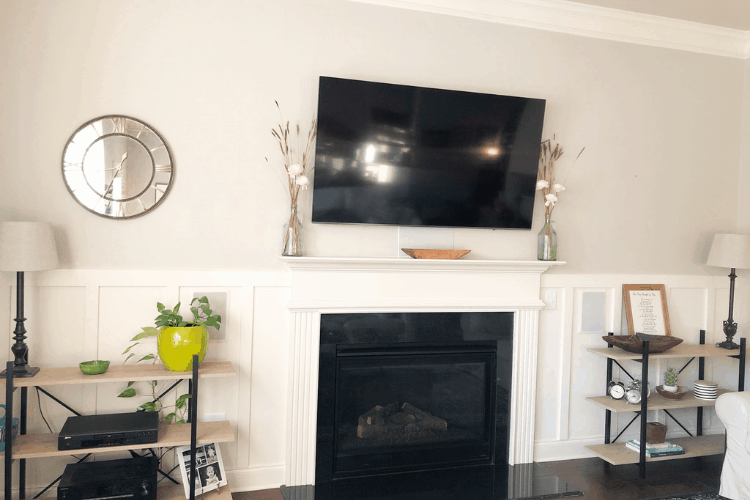
- paint it all one color – we chose to match our trim color which was also the same color as our mantel
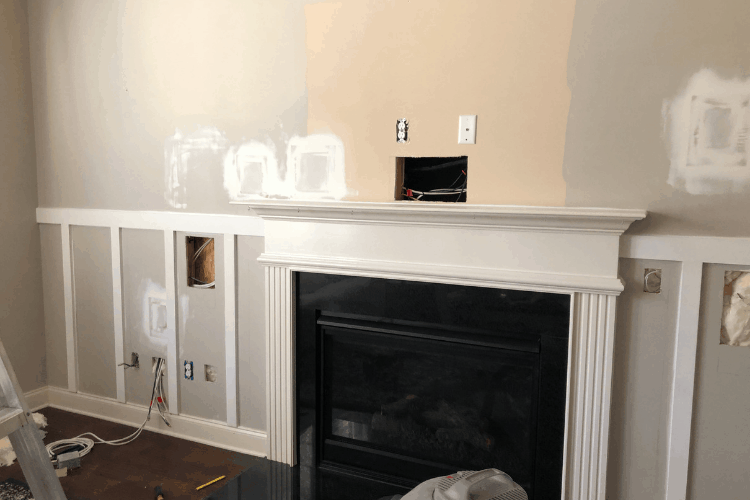
And let me apologize for the quality of these pics during the process. He worked mostly at night on some of the steps and I wasn’t able to get any good daytime shots! And if you notice that giant unpainted square above the mantel, let me explain. We painted our whole downstairs in Revere Pewter after we moved in.
However, we had already put a large mirror above the mantel and it was super heavy. We had a 3-year-old and 6-year-old at the time so he added finishing nails to ensure the mirror didn’t topple over onto them. We didn’t remove it before we painted it originally.

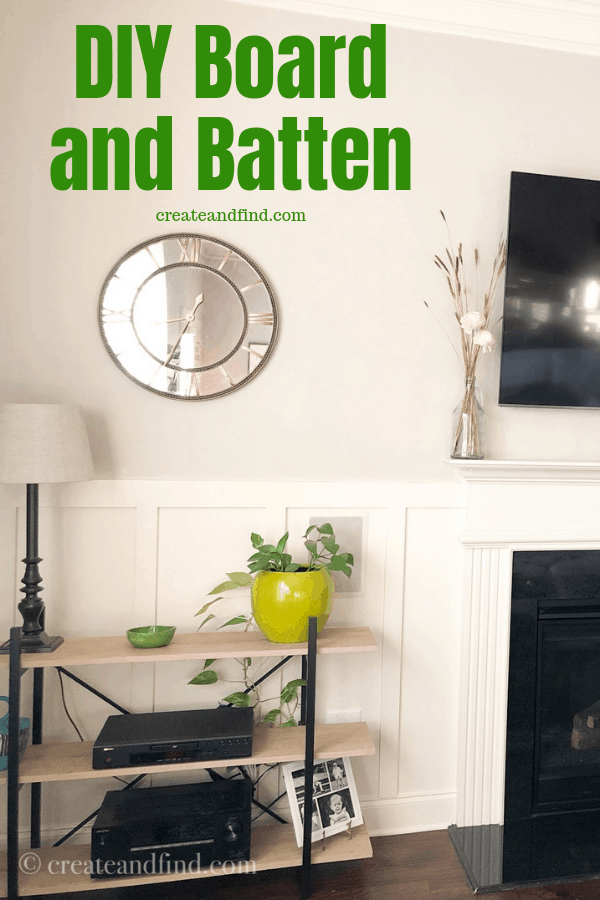
It looks odd at first, but once everything is painted it looks amazing! Of course, I still notice the overhang at the bottom, but lesson learned I guess! Be sure to get 1/2″ MDF instead of 1″ like we did so you won’t have the same problem. The shelving helps to take away some of the focus on the overhang, but I still notice it daily.
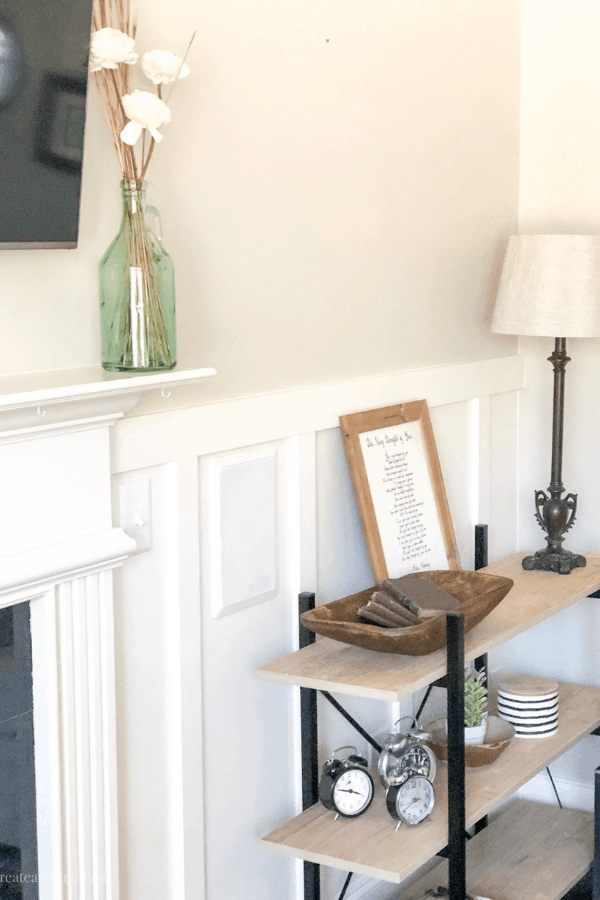
And speaking of those shelves – they were the most affordable option I could find at the time. I just couldn’t drop hundreds or thousands of dollars on furniture but we needed something to hold the necessary TV components. I use a plant to disguise some of the wirings.
My hubs worried about the contrast with the shelves and our coffee table (which by the way is my favorite table and super crazy affordable!), but I like the contrast.
Here’s the finished DIY board and batten in the living room!
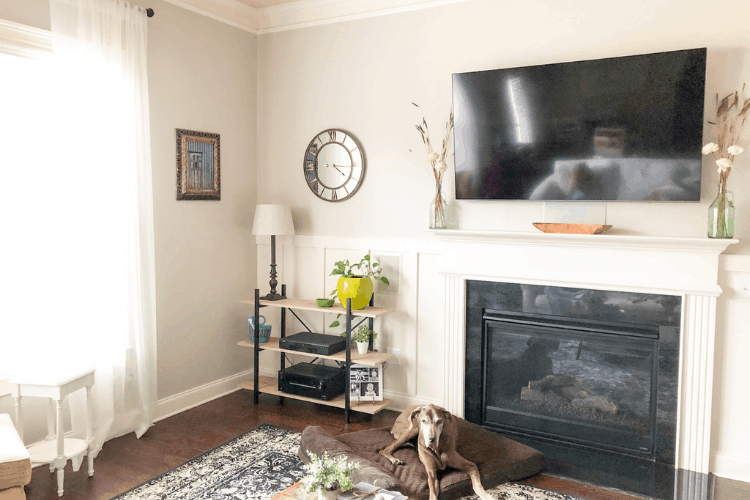
I’m still missing something else on the wall on the right, but I just haven’t found the perfect thing.
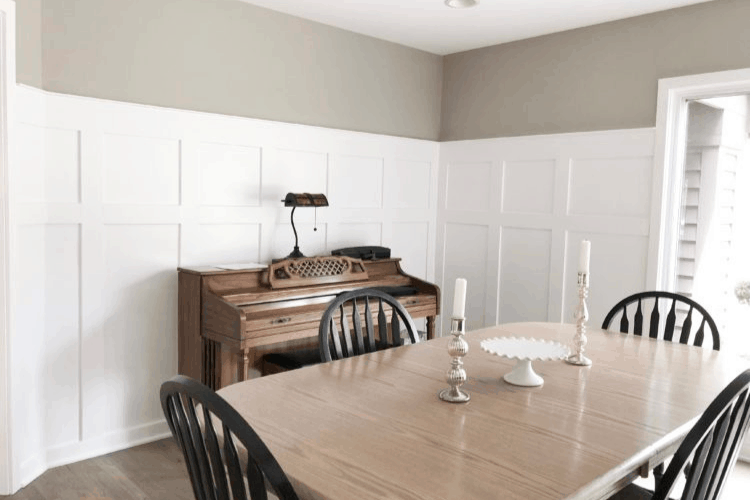
Board and batten is a very inexpensive way to add focus to a wall without too much work. You can add more horizontal boards if you choose. My friend Wendy from At Lane & High did this in her dining room – she went higher on the wall and added another horizontal piece which looks amazing!
Before and after our DIY Board and Batten!
I’m all about trying to find inexpensive ways to update your home. Of course, I’d love built-ins or other expensive fixes, but sometimes the budget just doesn’t allow for that. And that’s ok. You can still find ways to update your house the thrifty way! Just don’t hit any gas lines along the way!
For more budget-friendly DIY Projects like this board and batten, check out these:
DIY Baby Gate
DIY Farmhouse Table
Affordable DIY Industrial Lighting
And don’t forget to Pin It!

Arda
Saturday 7th of December 2019
What is your wall color please. It’s amazing and the right shade of grey I want.
create and find
Sunday 8th of December 2019
Thanks! It's Revere Pewter by Benjamin Moore. I love it! It changes slightly with different lights and it's a very versatile neutral gray.