This week, I’m starting my 3rd week of the $100 Room Challenge! In case you aren’t familiar with this challenge, here’s the scoop. You have $100 and 4 weeks to makeover a room. Come see what I’ve done and what’s left in my $100 kitchen cabinet makeover! And I’ve definitely made a few mistakes along the way. Learn some tips and come see my biggest mistake so far!
Erin from Lemons, Lavender, & Laundry started this great challenge a few years ago. Each person has 4 weeks and $100 to makeover a room. It’s meant to show people you don’t need a fortune or a money tree to update your house. DIY, thrifting, and your own hard labor will get you a long way!
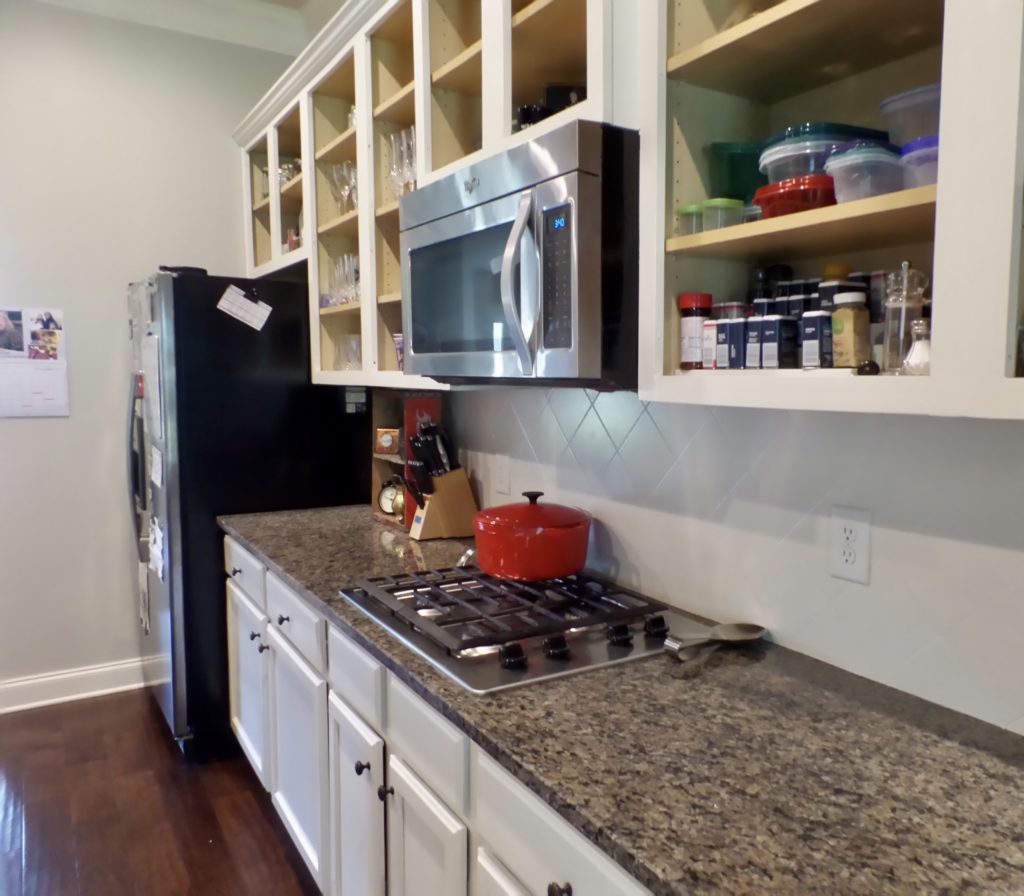
I’ll just say this has been a tough 2 weeks so far. Painting kitchen cabinets is no joke. Throw in some Hurricane Irma power outages (thankfully, that’s all we had to endure), kids home from school for two days, my regular job and there isn’t a whole lotta time left over!
If you missed it, check out what I’ve done so far:
WEEK ONE WEEK TWO
I ended up altering my plans slightly because I decided to work in sections instead of painting all doors/drawers at the same time. This decision is a matter of space. I just don’t have the room in the garage to lay it all out.
Week 3 Day by Day
And just a little note – week 3 is actually only my second full week of work because I didn’t start working until I had made all my plans.
- Day 1: We got our power restored this afternoon! Can’t use a paint sprayer without power. I thought I had just enough primer to spray the fronts of the upper cabinet doors. Ummmm. No. I ran out with 2 doors left. And here’s my big mistake. We have lots of paint, stain, DIY stuff already. I found some different primer that I had for a different project. However, it’s water based. Not the oil based Kilz I’ve been using. I thinned it according to the sprayer instructions. And here’s what I ended up with:

Sorry for the dark pic but it was dark in the garage. Clearly, a disaster. It didn’t even remotely attempt to cover this door. Obviously there are a few spots that aren’t clean enough. After I pout, I realize, this is the door above the cooktop and microwave. It is exceptionally greasy from years of cooking. So learn from me. Clean, clean, and clean it again. Here’s what I should ‘ve done – sand this one even though I used the deglosser. And clean it again. Then use the deglosser. Of course, I should stick with the oil based primer. It’s awful to smell (wear a mask), and a giant pain to clean (hello, mineral spirits), but it’s been far superior for this job.
So this little disaster puts me behind. I had to wait for it to dry, then sand off as much as possible and start over with the oil based primer. Not to mention, that’s more money out of my budget because I had to buy more primer.
What a way to start Day 1!
- Day 2: Clean all the upper cabinet frames inside, my hubs used caulk to fill in the gaps in the crown moulding, and I sanded my mistake door.
- Day 3: 1st coat of paint on backs of doors – I used the sprayer again. I cleaned the inside cabinet upper frames the same as the bottom. The only exception is I switched cleaners from TSP to Zep 505 – primarily because of ease of use and I don’t have to dispose of a mop bucket full of TSP water. It can’t go in the septic system. So Zep it is!
- I also wipe everything with a liquid deglosser after cleaning. On this day we also had an unexpected family emergency. Thankfully, all is well though! This put me behind (and that’s perfectly fine – things happen) so it was late when I started priming the cabinets inside. However, here’s the lesson – I was tired. Beyond tired. I had a different kind of roller cover in my stash outside that is specifically for primer. I hated it. It was messy and I couldn’t get a clean line anywhere. See below:

That is not the kind of look you are going for with primer. Don’t forget that primer is the foundation for your paint. Like foundation for your face. If there are runs and blobs and bubbles in your primer, every bit of that will show in your paint unless you sand thoroughly between coats.
So lesson learned – I quit for the night. Sometimes you just have to call it. Life happens, power goes out, people get sick. It’s ok.
- Day 4: Long day at work – nothing accomplished on the kitchen today
- Day 5: Prime cabinet frames inside, and spray the fronts of the doors with paint. Jump up and down because I’m done spraying!! 1st coat of paint inside as well.

Tip: Here’s a major lesson I learned too! After spraying primer with a paint sprayer, the finish can feel rough. I took the extra time to lightly sand each upper door after priming with fine grit sand paper. Huge difference!! Take a lesson from me and don’t skip this step. I’m kicking myself for not doing it with the lower doors. The finish after painting is so much smoother since I sanded the primer. Note to self – always, always sand between coats.
- Day 6: Nothing – long day of work
- Day 7: I did the 2nd and final coat of paint inside. Yes!!! Done. The doors are still in the garage. Since I painted them on Saturday, I’m waiting at least 2 full days before bringing them inside to hang. Don’t get impatient. You want your paint to have time to cure a bit before you go hanging stuff and bumping into things.
To say I’m tired is an understatement. This is a big project. However, it’s worth it and I can already tell how much lighter and airy our kitchen feels with the progress I’ve made so far.


Whew! If you made it to the end of this lengthy post, congrats! I like details and especially if I’m searching tips on how to complete a major project like painting kitchen cabinets DIY style, I need details!
And here’s the budget breakdown so far:
Spent in WEEK 1 and WEEK 2: $68
This week:
- $8 for a new quart of primer
- $10 for a new brush (I messed up one of my good ones)
- $2 for a new outlet and cover (the brown one on the side of the counter won’t look light anymore) so I’m up to $88 out of my total budget of $100.
I’ve got roughly 12 bucks left. Not a lot for decor. I’ll be shopping my house and my neighbor’s house. She’s getting ready to list her house and is purging stuff! Yay for generous friends!
I was hoping to have enough to buy some of these great finds I discovered but no such luck on this challenge.
Stay tuned for next week and the final reveal of my kitchen cabinet makeover!
And please don’t miss all the other talented bloggers that are participating in this $100 Room Challenge!
[inlinkz_linkup id=738657 mode=1]

Natalie @nelidesign
Tuesday 26th of September 2017
I love it when we discover something and share this tip with our readers! I will remember the sanding after the spray paint primer! Can't wait for next week!
Melissa
Wednesday 27th of September 2017
Thanks Natalie! And I agree! It's so helpful to have some handy tips when you are starting a project!
stephaniegriffithhome
Monday 25th of September 2017
This is going to be a great transformation this week!
Melissa
Wednesday 27th of September 2017
Thanks Stephanie! I can't believe we are done with the challenge!
Deneen
Monday 25th of September 2017
I think you should get a prize, just for taking on the kitchen. The next time you use oil based paint, you can use vegetable (or olive) oil to get the paint off of your skin, instead of mineral spirits or turps. So much easier on the hands (or face, if you are really messy :))
Melissa
Monday 25th of September 2017
The prize for being crazy maybe! And thanks so much for the tips! I've never heard of doing that. I'm definitely saving that one for reference.
Erin @ Lemons, Lavender, & Laundry
Monday 25th of September 2017
I so admire your patience. I always want to rush through and get stuff done, and then it doesn't turn out the way I wanted. When we get to our kitchen cabinets, I'll be remembering this process, and make sure I use a whole lot of patience to make sure things are done right. Can't wait for the reveal!
Melissa
Monday 25th of September 2017
I can honestly tell you no one has ever spoken the words "I admire your patience" to me! I'm usually not at all that way, but I knew this one needed to be right since we see it all day every day! I can't wait to see your kitchen when you take the plunge.
Lindsay
Saturday 23rd of September 2017
Wow!! The white paint is already making such a huge difference - the whole space looks huge!!
Melissa
Sunday 24th of September 2017
Thanks Lindsay. I agree! It definitely opens it up!