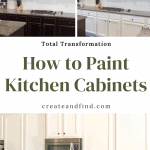
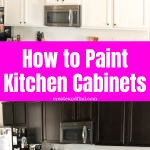
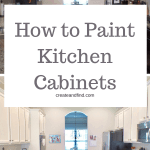
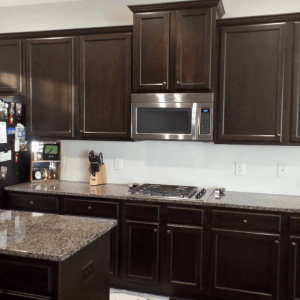
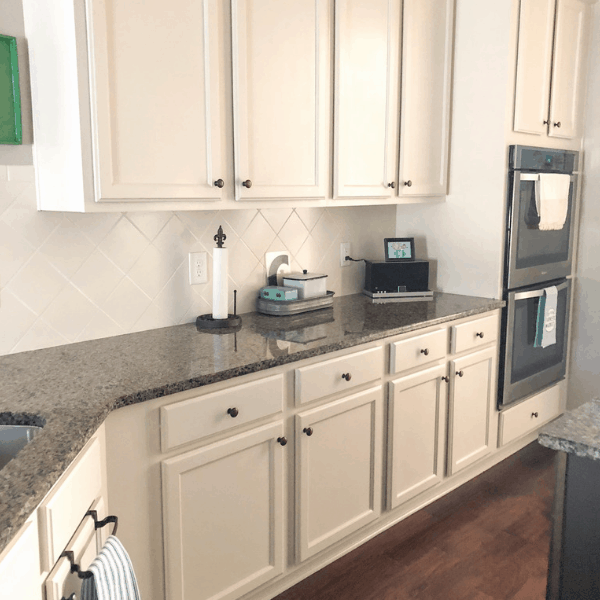
I painted our kitchen cabinets and changed them from a dark stain to white. Since then, I’ve had a lot of questions on how to do it, what paint to use, and what steps to take to make sure it turns out great. When I painted ours, it was a process over several weeks. However, I realize if you’re considering this huge DIY project, you might just need a quick tutorial. So if you want to know how to paint kitchen cabinets in a short, condensed version, this is for you!
Painting kitchen cabinets takes work and time, but it’s a dramatic difference and huge cost savings. I’ll show you exactly what steps to take and materials to use to paint your kitchen cabinets.
If you want to see all the details about our kitchen, check out the reveal of my $100 thrifty kitchen makeover: From there you can see all the different weeks and progress.
RELATED POST: $100 kitchen cabinet transformation
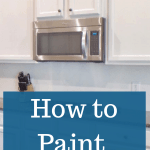
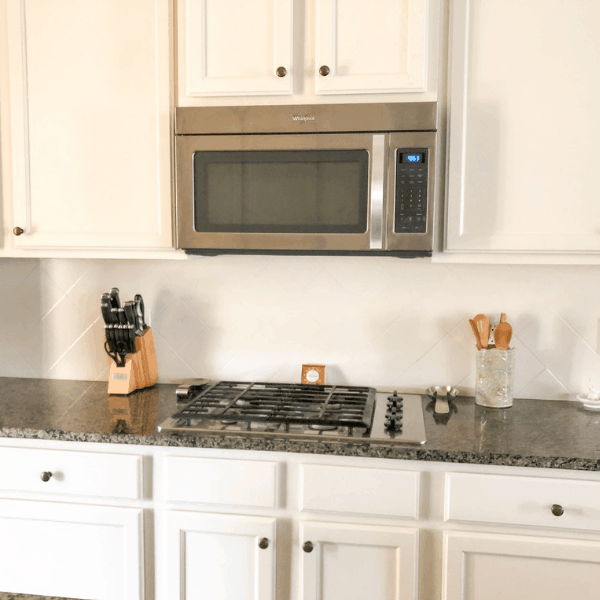
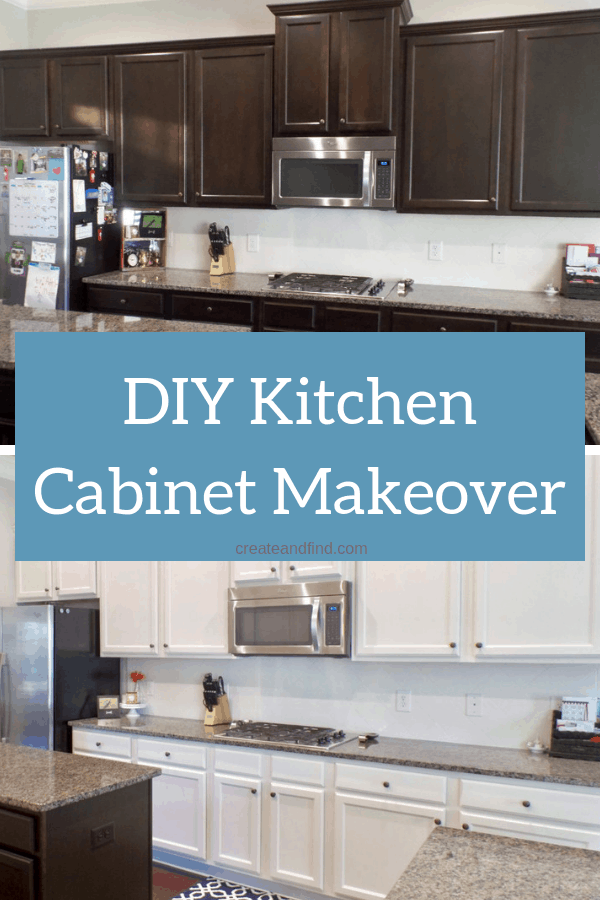
Here’s a little before and after to show you what I started with and the finished project: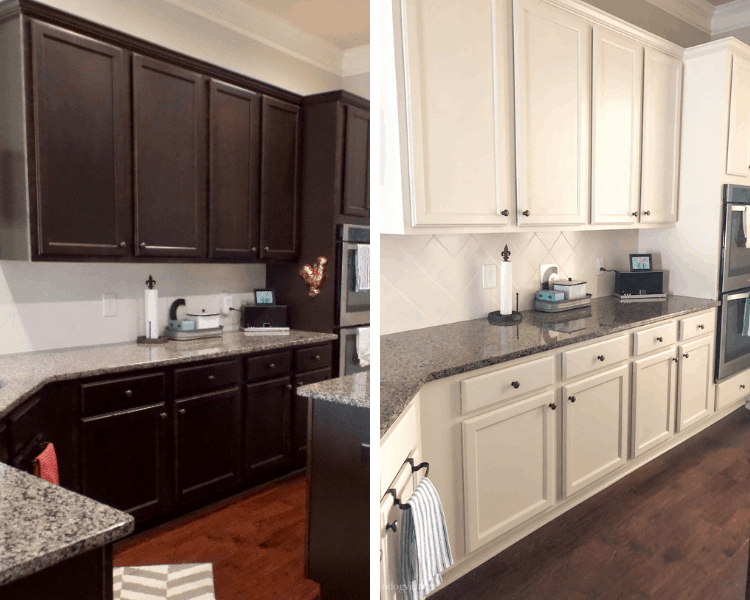
This is a guide to tell you what products you need, how to use them, and how to get a flawless finish.
And consider this – if you hire this project out – be prepared to spend around $4000-$6000. That’s right. That’s the going rate for painting kitchen cabinets where I live. Give or take a bit depending on your area, but you’ll spend thousands.
Or you can follow these steps, put in some serious effort, and save several thousand dollars. And trust me – you can do it. You need patience and time, but you can do it!

RELATED POST: DIY Boardgame Cabinet Makeover
How to Paint Kitchen Cabinets
Now don’t get me wrong. This is a beast of a project. It’s time-consuming and you may need to work in stages to get it done. Even if it takes you several weeks, it’s 100% worth it to do it yourself. And the impact on your home is incredible. Kitchens are the center of the home – think of how much time you spend in your kitchen. Why not love it?? And save money? It’s a win-win situation.
First things first:
Consider investing in a paint sprayer.
I know – I’m telling you how to save money and then suggesting you spend it. But. This is a game-changer. It’s unreal how much different it looks to spray, as opposed to brushing it. Spraying gives you a professional-looking finish.
No brush strokes. It has a bit of a learning curve, but practice on some scrap wood or cardboard and you’ll be a pro in no time.
Honestly, it takes longer to clean the thing than it does to use it! I used a brush for our bathroom cabinets and a sprayer for the kitchen and the difference is amazing. Our bathroom needs to be repainted already.
The kitchen – still looks the same as the first day I painted it. It’s worth it – get a sprayer. I have the HomeRight Finish Max and love it. I would buy it again and again. And it’s around $70. Flawless finish for less than $100. 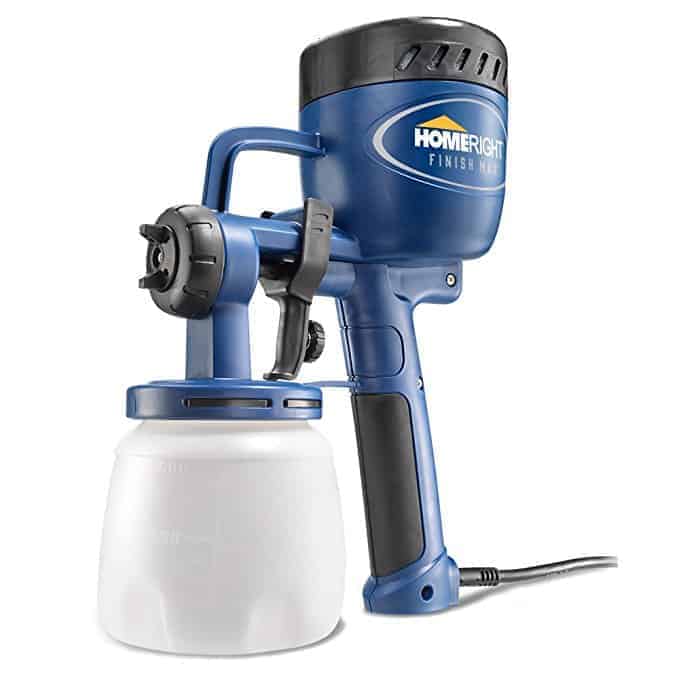
Prep for Painting Cabinets
This is by far the most tedious step in my opinion. Prep work is boring. It just sucks if we’re being completely honest, but it’s absolutely necessary. You don’t want to spend money on paint and the time to do it if it peels away in a few months. Do not skip or gloss over this step. Here’s what you need to do and how to do it:
- Make a diagram of your current kitchen. A simple sketch that numbers your cabinets. Trust me. Do it – you’ll refer back to it many times. Nothing fancy – grab a pencil and a sheet of paper and make a sketch and number all your cabinets and drawers. Here’s what I did
- :
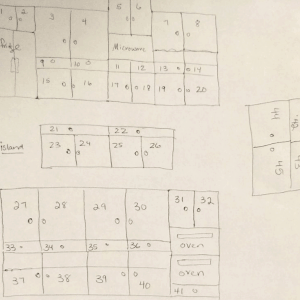
- :
- Section off the kitchen in order of how you want to proceed. All the uppers first or lower cabinets. It doesn’t matter. But you likely can’t get them all done at one time.
- Take off the doors and drawer fronts and all hardware. Label them all. I use a sharpie and write a number in the holes from the hinges and then put painters tape over it (this way it doesn’t get covered up with paint – when you’re done, peel off the tape and you’ll know exactly what goes where). Use a Ziploc bag for each set of hardware and label with a sharpie. Number them according to your sketch for each individual set. My doors had two sets of screws and hinges – everything got its own baggie.
- Clean everything like your life depends on it. Use Zep or TSP. Stock up on gloves and use something that has some serious degreasing power. I used a combination of both of these products and it works like a champ. Either is fine.
- Use a liquid deglosser if you’re painting over a slick surface. I prefer this over sanding and it’s worked perfectly for me. Our cabinets were a dark stain and I painted them white. The liquid deglosser was perfect for giving the new paint something to adhere to. Follow the instructions on the can. For me, I used a lint-free rag to apply it and wiped all the surfaces of the doors and drawers, including the sides and then around the cabinet bases inside. Make sure everything is dry before you start to paint or prime.
Don’t skip these steps. This is such a huge project and since your kitchen is likely a high traffic area, your paint needs to stand up to abuse. Giving the surface a good prep is so worth it in the end. Do this and pat yourself on the back – it’s a total suckfest, but once it’s done, it’s done!
Priming
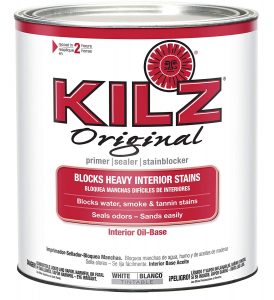
- Since my cabinets were stained very dark, priming was a must. I use Kilz oil-based primer. I’ve used water-based and had a complete disaster. Oil-based primer stinks and it’s a pain in the you know what to clean, but it does the job. This is my favorite and I would use it again and again:
- Make sure you clean your brushes and/or sprayer with Mineral Spirits after using oil-based primer. You cannot clean it with soap and water. Personally, I use a decent brush that I’m not keeping when using an oil-based primer. I’ve found it’s pretty time-consuming to clean it properly. However, it can be done. So if you don’t want to waste your brush, clean it thoroughly with mineral spirits. And mineral spirits can’t go down the sink. Make sure you check the proper disposal procedure in your area.
- When I use primer in the paint sprayer, I keep a bucket filled with mineral spirits to clean everything. You’ll need to clean all the parts of the sprayer and your brushes if you choose. Then when I’m finished, all the rags used and the leftover mineral spirits get disposed of properly. Again – check your local requirements and please don’t put this stuff into your septic system or down the drain.
- In my case since we had such a dark stain to start with, I used the sprayer and applied two coats of primer, making sure to let it dry properly in between. If you have space in a garage, lay all the doors on a large tarp and paint the backs first.
- You’ll need to wear a mask when spraying paint or primer. And be prepared that wherever you are spraying, there will be a fine mist of primer and paint everywhere. Cover anything that you don’t want to be touched.
Use very fine sandpaper and sand between coats!
I skipped this step the first time around and it was a mistake. Sanding is the key to getting a flawless finish with the sprayer. Spraying leaves a very fine mist of paint. It can feel gritty or rough at first. Sand between coats and it’ll be smooth as satin.
- Prime with sprayer
- Sand with very fine sandpaper
- Prime the second coat
- Let dry completely and flip the doors over and repeat with the fronts. If you get any drips or runs, wait until it’s dry and sand them away. In between letting the doors dry, I primed the inside cabinet bases. You can use a combination of a small roller and a brush for this part.
And one tip about primer. When you’re priming the bases with a brush or roller, less is more. You don’t want a thick, globby primer on your bases. What you need is a thin coat that covers the surfaces just to give the paint a good base to stick to. If it’s solid white after priming, you likely used too much.
The primer looks hideous when it’s done. You’ll think you’ve messed it up. You haven’t. It’ll be a streaky thin coat. That’s what you want. It shouldn’t look like blobs of toothpaste all over your cabinets. Thin. And primer dries fast. Be careful not to drag your brush around too much. Paint a thin coat and leave it alone. If there are any mess-ups, just wait until it’s dry and sand it off.
Paint the Cabinets
The paint color on my cabinets and tile is Panda White from Sherwin Williams
When it comes to painting your kitchen, don’t skimp on the paint. Invest in decent quality paint and you won’t be sorry in a few months or years. And if necessary, get a few samples if you can’t decide on a color.
It’s worth it for the amount of time and effort you are about to put into your new kitchen. You can get a paint sample from any paint store for a few bucks. Paint a large piece of poster board and hang it up or tape it to a cabinet door so you can get a feel for the color in different lights.
Personally, I use Sherwin Williams Pro Classic Interior Acrylic Enamel paint. It’s water-based, but don’t worry about painting over the oil-based primer. It works perfectly fine. And it dries to a super hard and durable finish and doesn’t need a sealer. I chose a semi-gloss finish. It’s super easy to clean which is necessary for the kitchen!
If you’re using a sprayer, you may need to thin the paint first. If you’re using water-based paint, you thin with water. There are detailed instructions and a cup to use for thinning.
For me personally, I didn’t need to thin the primer, but the paint had to be thinned. Use a small bucket or pail and thin only what you are using in the sprayer each time.
- Use the same process you did with the primer. Start with the backs of the doors and spray the first coat.
- Fine sandpaper after it’s dry, then paint the second coat.
- Flip and repeat on the fronts.
- Paint the inside bases while you’re waiting on a coat to dry.
- Be sure to clean your sprayer after each use. You don’t want all the moving parts to get clogged up with paint.
- Keep a damp lint-free rag nearby and if you accidentally get some paint on the counter or floor, quickly wipe it up with the rag.
Let dry and put it all back together
This is the part where you will be over it. You’ll be antsy to get it back together and have a normal kitchen again. Let everything dry completely – even for a day or two if you can. It takes paint several days to weeks to fully cure.
The longer you leave it untouched, the greater chance you have of having a hard, durable surface.
Recap of Steps:
- Make a rough sketch of your cabinets and number everything
- Label all your doors and drawers as you remove them
- Clean everything like you’ve never cleaned before. If you leave any greasy residue or splatters, the paint will not stick to it
- If it’s your first time using a sprayer, practice first on a piece of wood or cardboard.
- Paint two coats of primer, sanding in between coats
- Then do two coats of paint, again – sand between coats
- Let dry for a few days at least if possible, then put it all back together
- Give yourself a high-five for saving thousands of dollars
Products for Painting Kitchen Cabinets:
- Paint Sprayer
- Primer
- High-Quality Paint
- Paint Pail and Liners
- Foam Rollers
- Quality Brushes
- Tarp
- Mineral Spirits
- Rags
- Gloves
- Sandpaper
- Masks
Since I already had the sprayer and most of the supplies, I spent less than $100 to paint our cabinets.
But, let’s just say you have to buy everything. You will likely spend around $300. Compare that to thousands of dollars to hire a pro to do it and you’ll save yourself a nice chunk of change!
And if you’re curious about painting tile backsplash, it can be done too! Ours was brown and with $18 worth of paint, I painted it white. It’s been almost two years and it’s holding up perfectly. Get all the tile painting details here!
If you’re on the fence and have any questions, feel free to email me – melissa at createandfind dot com. It’s worth it. I promise. And it’s a great DIY project when you just don’t have thousands of dollars to gut the whole kitchen and start over.
And be sure to pin it for later!

Alex
Monday 7th of October 2024
This is so great! I've been trying to figure out how to paint my cabinets for ages because I definitely don't have it in the budget to hire a professional. I can't wait to try it. Thanks for sharing!
Louise
Friday 5th of March 2021
Love your kitchen so much. I have been reading through your various posts for painting cabinets and backsplash. Sherwin-Williams you used for the cabinets is in what color? And is your backsplash same color? It looks amazing.
create and find
Friday 5th of March 2021
Thank you so much for the compliments! We used Panda White from Sherwin Williams on both.
Molly
Sunday 19th of April 2020
Hi! This looks incredible! I’m planning on doing my kitchen this week. I have just 2 questions. What color paint did you use? Also, I have a sprayer. Did you spray the tile as well? Thanks so much!!
create and find
Sunday 19th of April 2020
Hey Molly! Thanks so much. The tile is not sprayed - I've got all the details here and the color is Panda White from Sherwin Williams. That was the color of all our trim in the house so I stuck with that. It's an off white. Good luck to you!