


Sometimes there is a piece of furniture that is amazing quality and craftsmanship, but just not quite your style. That’s how I felt about a gorgeous traditional buffet that I bought from a friend. There is nothing wrong with it functionally, but I didn’t love the look. So here is how I gave a traditional sideboard a modern makeover.
This sideboard makeover was a labor of love for sure. But I knew it had potential if I could just figure out how to make it work. I wanted to take this super traditional sideboard and give it a modern look. It took a few weeks and I had some help from my husband, and I also made a few mistakes but I love it now!
Mid-century modern style is something I’ve loved for a while. I’m gradually transitioning some of my styles towards a modern vintage look.
Styles change and what we love for our houses changes. And that’s ok! You do you! If you have loved farmhouse style for the past 5 years, but now you want to transition away from it, do it! If you prefer a more modern look over your previous traditional style, make it happen.
There is no rule that you have to keep things the same. And for the record, I’m a huge fan of mixing styles. It’s your house and you should be happy. Mix it up – vintage, modern, farmhouse, traditional – whatever works for you and your family!
RELATED POST: Cabinet Makeover Without Sanding
Traditional Sideboard Makeover
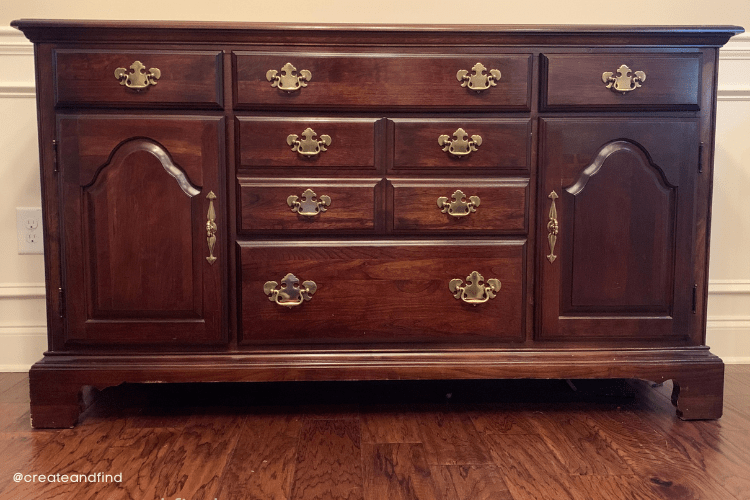
This piece came from a neighbor friend. It’s been in their family for a while and she was ready to pass it on to another home. I’m not an expert, but if you asked me for a description it would be traditional.
It’s solid wood and it was in perfect shape other than a few teeny blemishes. And the storage!! Who doesn’t need more drawers and cubbies to hide things away in? And of course the price – $75. Can’t beat that!
For the record, I checked around a few places to buy one and found some stunning options, but way out of my price range.
My plan for this was to update into a more modern look and replace our current buffet in the living room. And while there was nothing wrong with what we had, it definitely wasn’t modern and I’m ready for a new look! You can see our current buffet and its transformation here.
And here’s what I started with before the makeover:
RELATED POST: Old Table Makeover Without Sanding
Plans for the Sideboard Makeover
- Remove the bottom part and add modern legs/feet
- Change the hardware
- Fill in the grooves of the doors and sides to add to the modern look
- Paint
Traditional Sideboard Makeover Supplies:
- Sherwin Williams Emerald Urethane Trim Enamel Paint in Satin Finish – Color Essex Green
- Minwax Wood Filler
- Putty Knife Set
- Circular Saw
- Straight Edge Guide for Circular Saw
- Electric Palm Sander and Sandpaper (I used mostly coarse and medium)
- Sanding Blocks
- Modern Feet/Legs (I used the 4 inch)
- New Modern Hardware 2.5 inch
- New Modern Hardware 3 inch
- Paint Pail and Liners
- 2 inch Paint Brush
- Primer – Kilz
- Paint Can Pour Lid (these are lifesavers!!)
Budget Breakdown
I always like to see how much things actually cost when starting a project if possible, so if you’re into that, here you go!
| Item | Price | Total |
| Buffet | $75 | |
| Wood Filler | $30 | |
| Paint | $30 | |
| Hardware | $31 | |
| Legs | $14 | |
| All other supplies | $0 (already had) | |
| $180 |
$180 isn’t exactly chump change, but compared to what I am finding online to purchase new, it’s significantly cheaper. Also, I sold my current buffet for $125. This is amazingly cheap but it was the Wednesday before Thanksgiving and I wanted it gone that day. In hindsight, it was far too cheap – I should’ve asked for a minimum of $250. Oh well.
So $180 minus $125 for the old buffet, I’m out $65 total.
Traditional Sideboard Makeover
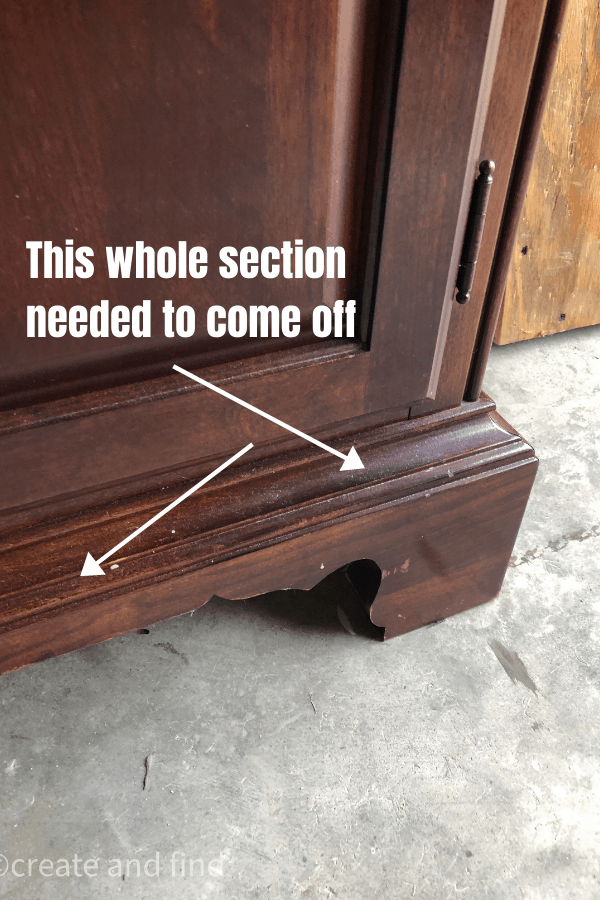
This thing was a labor of love and my husband thought I was nuts for some of the ideas I had (as always) such as cutting off the bottom portion.
The bottom part just didn’t give off all the modern vibes I am hoping for so it needed to go. Also, I knew I wanted to add modern legs/feet and it was going to be far too tall to fit behind our couch without cutting part of it off.
It was 32″ tall with the current structure and the max I could do with our couch is 29″ without looking super weird.
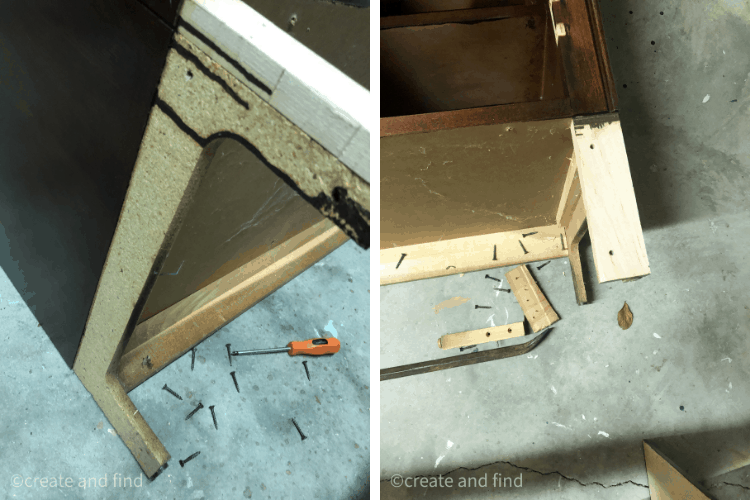
So, here’s my style. Just try it. See what happens. We turned it on its side and I just started unscrewing pieces. Worst case scenario, it falls apart. But I didn’t think that was going to happen.
My husband will sit and stare at it forever assessing and thinking logically, but I’m too impatient. Just get in there and try.
For the record – his method is likely more effective.
Once I had enough screws removed, I could tell the bottom portion was getting loose. So we kept on and finally got the entire bottom to slide right off.
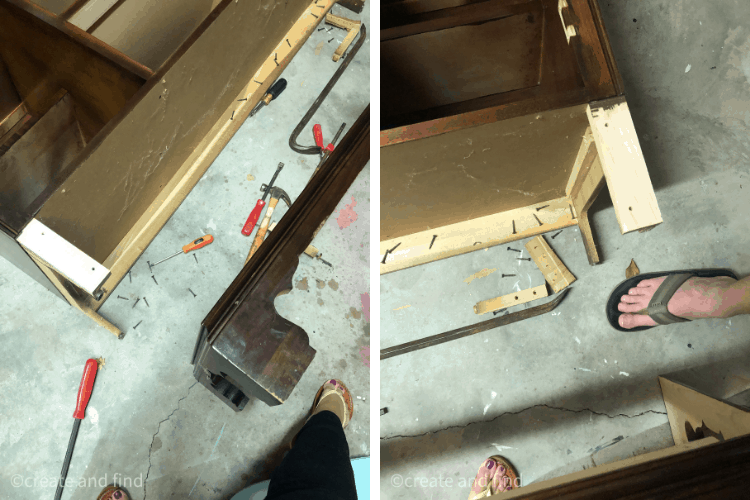
Now, all we needed to do was cut the supports. Here’s another issue – if you cut the supports, is it going to affect the integrity of the rest of the piece? I don’t know, but again, I’m a wing-it kind of person, and 50% of the time it works out. This time it did thankfully.
“Wing it – what’s the worst that could happen?”
…me right before I get real nervous I’m about to really mess up
My husband helped with this part because I’m not that fond of using electric saws yet. We turned it upside down on sawhorses and he cut the bottom portion completely off.
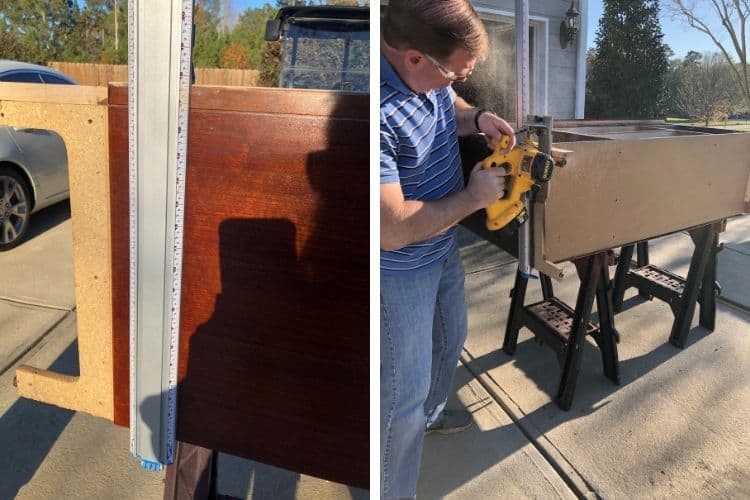
He used a straight edge guide for his circular saw which worked wonders with keeping the saw from cutting uneven. It takes some calculations to get it set correctly, but it helps tremendously.
We also had to slightly trim the backing that was on the piece since we removed part of the height. He pulled the staples out that held it on, trimmed it slightly, then hammered the backing in place again.
And now it looked super weird and awkward because it was short and stubby.
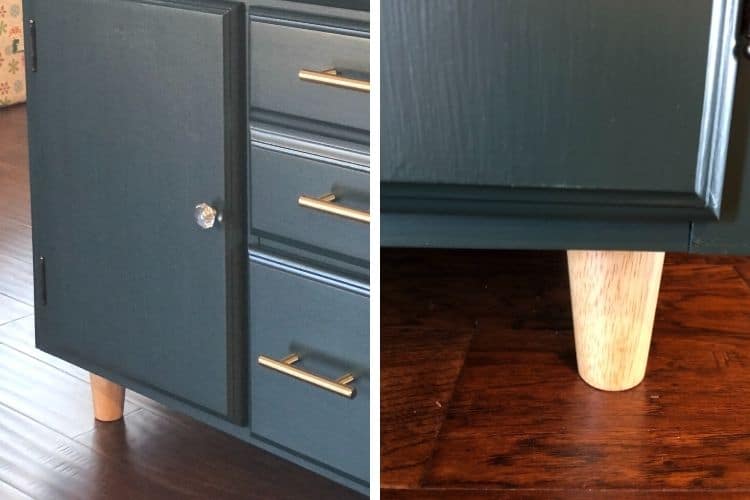
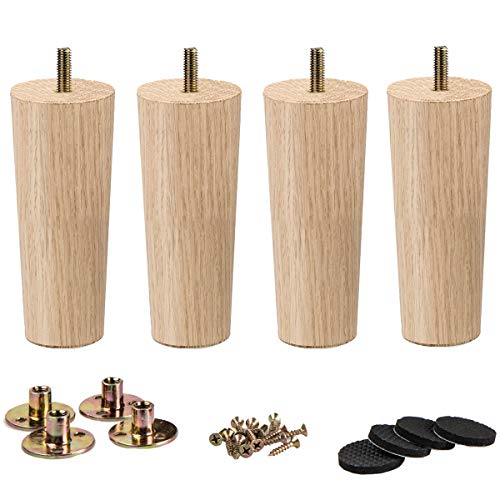
New Legs for The Sideboard
But enter these amazingly affordable and stylish 4-inch legs and she was good to go. These came with the hardware we needed to install them. Since we were not actually replacing legs, it didn’t go exactly as planned. You can see the top of the screw inside the buffet when you open the doors.
But, it’s not enough to make me upset about it or worry with finding different legs. Especially at the price for those – they were exactly what I wanted and super affordable.
Mistakes I Made with The Sideboard Makeover
So, I mentioned I made some mistakes. And you know what? It’s ok. It still looks good. However, if I were trying to sell this piece for a profit, I’d fix those mistakes prior to selling. And I’ve learned a lesson in wood filler and primer to use for the next time
This sideboard had curvy grooves in the doors that were not meshing with the modern vibes I had in my head. I decided to fill them with wood filler.


Why use wood filler instead of wood putty?
There are a few reasons I chose wood filler over putty in this case, but the main one is the drying time. Filler dries much quicker than putty. In addition, my space to fill was larger so I thought filler would be a better choice. I used this post as a reference for my choice – it explains it all in great detail.
So, I started adding wood filler. Let me caution you – per the manufacturer, it’s designed for the following:
“for filling cracks, small gouges, nail holes, knot holes and other defects in unfinished wood”
I’m not entirely sure my grooves in the wood would qualify for “small gouges” but I went with it anyway. I’m sure there is an easier and better way, but at the time, that’s what I used. This is the filler I used.
Adding Wood Filler to Make My Buffet More Modern
I started with the vertical grooves on either side of the buffet. I was going for more of a modern clean lined look and just didn’t love the grooves.
The key is not to add too much at one time. Use a putty knife and gently add a bit of putty into the grooves. Let it dry completely, sand, repeat. Continue until you have the coverage you want.
The doors were much harder due to the deep grooves. I continually added filler, let dry, sanded, repeated. Over and over and over again.

Here are my two main mistakes I made when dealing with the filler:
- I didn’t build up enough filler. In certain lights, you can still see a tiny indention where the grooves were. It’s not enough for me to do it over, but if I were selling this piece, I’d absolutely have to fix it.
- The second mistake was not priming the doors before painting. I didn’t prime the rest, so I thought the doors would be fine even with filler. They weren’t.
When I painted the rest of the buffet, I didn’t use a primer. When I got to the doors, I painted just like the rest, but when it dried you could see a clear outline of the grooves. I added more paint but it didn’t work.
I then realized I should have primed it. So I sanded it good. Then, primed it (using a brush), then painted and it worked great. However, at this point, I had so many layers of paint that it ended up showing tons of brushstrokes.

In hindsight, I would add more filler to the doors, use a spray primer, and prime the areas first. Then paint.
But again, it’s not enough to keep me from using it. It’s only noticeable during a tiny portion of the day when the light hits it just right. However, I would redo the doors completely if I were selling this piece.
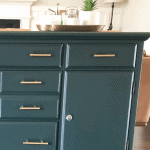
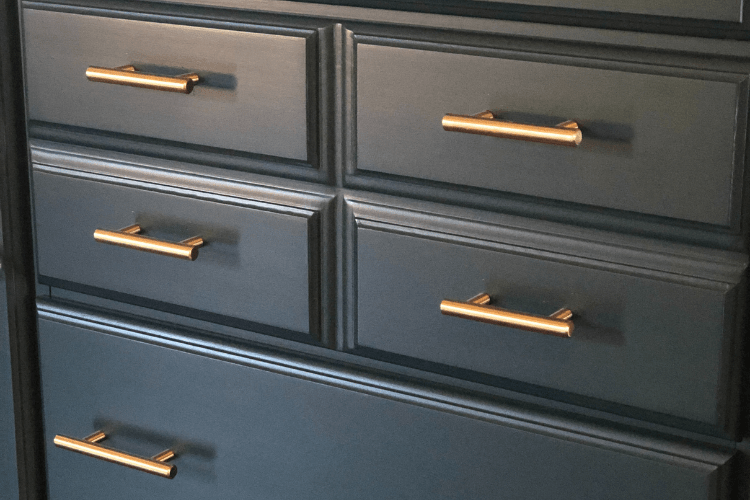
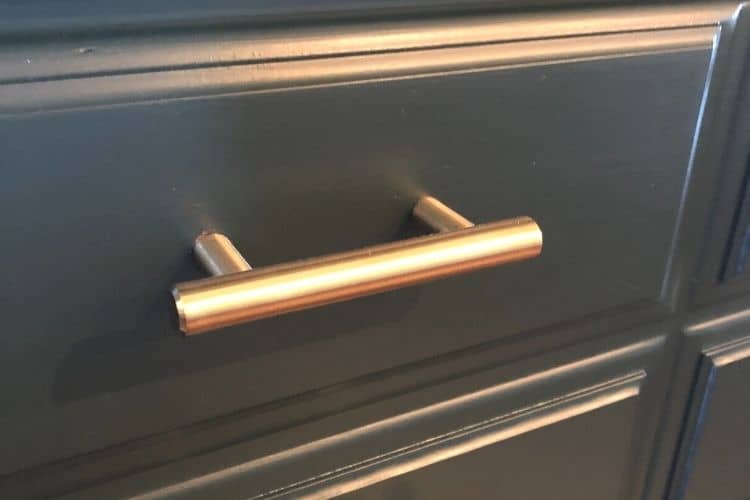
Modern Hardware
I finished it off with this gorgeous modern hardware I scored from Amazon. It was super affordable and the only downside is I had to order two sizes so I have a few leftovers. However, I’ll save them for another project.
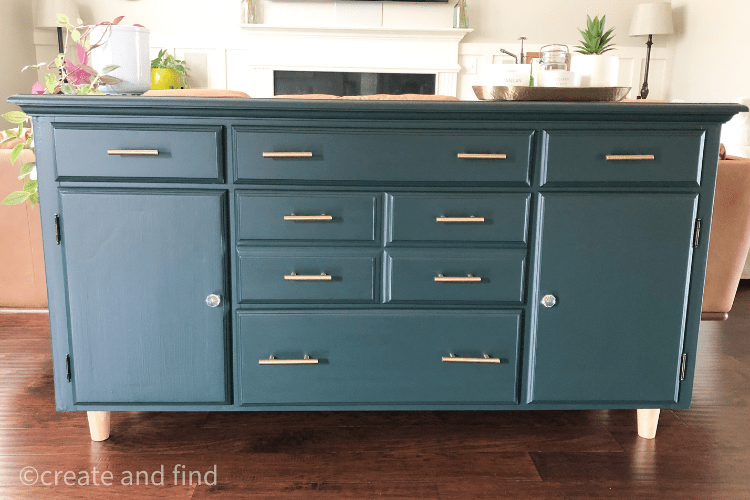
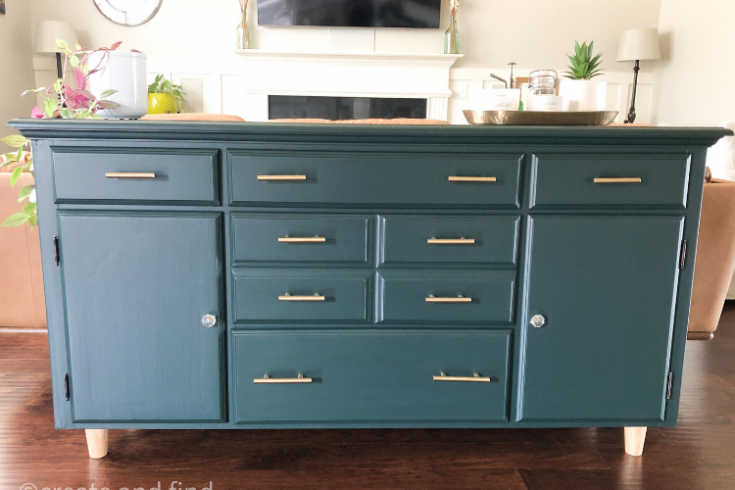
And just a reminder of what I started with:
It’s not perfect by any means, but for the price and the end result, I love it. It has amazing storage and it fits perfectly behind our couch.
I know some people are against changing perfectly good furniture, but if it doesn’t make you happy and match your style, I say go for it.
This traditional sideboard makeover is exactly what I wanted for far less money than if I had purchased something new.
If you’re just getting started, check out this guide for painting wood furniture to help you!
How To Make A Traditional Buffet More Modern
Transform a traditional buffet/sideboard into a more modern piece of furniture.
Materials
- Paint and Primer
- Wood Filler
- Brushes
- New Hardware
- Legs
- Cleaner
- Sanding Blocks
Tools
- Circular Saw
- Putty Knife
- Screwdriver
- Drill
- Electric Sander
- Straight Edge Guide
Instructions
- Prep your piece by removing all the hardware - label in bags if you plan to reuse
- Remove any doors and store hinges/screws in bags labeled left and right if necessary
- Clean thoroughly with a degreasing cleanser
- Add wood filler to the areas you are changing, let dry, sand, repeat until the desired result
- Prime over the areas covered with wood filler
- Paint two coats, waiting the proper drying time in between, let dry fully
- Reassemble
Recommended Products
As an Amazon Associate and member of other affiliate programs, I earn from qualifying purchases.
-
 Minwax Stainable Wood Filler, 16-Ounce
 -
 Goldenwarm 5pcs Brushed Brass Cabinet Pull 3in Hole
 -
 10 Pack Gold Drawer Pulls 2.5in
 -
 KILZ Original Multi-Surface Oil-Based Primer (Low VOC Formula) White, 32 Fluid Ounces
 -
 Shur-Line 2000576 Quart Store and Pour Paint Can Lid, Sold as 5 Pack
 -
 Wooster Brush Paintbrush, 2-Inch
 -
 Handy Paint Pail, 1 Pack, Red
 -
 Handy Paint Pail Liners, 6-Count, Clear
 -
 Zep Fast 505 Cleaner and Degreaser
 -
 Emerald Urethane Trim Enamel
 -
 4 inch Wooden Furniture Legs
 -
 Bora 50" NGX Clamp Edge, Straight Cut Guide For Circular Saws
 -
 DEWALT 20V MAX Circular Saw
 -
 12 Pack Sanding Sponge
 -
 2.0 Amp 1/4 Sheet Palm Sander with Pressure Control
 -
 WORKPRO 4-Piece Putty Knife Set

Les
Friday 27th of January 2023
This is so inspiring! I’d love to know where you got the cabinet knobs
Les
Tuesday 31st of January 2023
Okay, somehow I missing them- I see the gold drawer pulls but not the cabinet knob link. Thanks though :)
create and find
Monday 30th of January 2023
Thanks - I linked them in the post. They are from Amazon and super affordable!
Craig
Saturday 19th of March 2022
A great article. You should consider auto body filler for things like the grooves. As a two part mixed system it dries really fast and hard.
create and find
Sunday 20th of March 2022
Thank you! I wish I had done that. I found several articles that suggested that after I had already finished. But good to know if it comes up again - seems to be a much better way to fill those grooves.
Alisson
Wednesday 8th of December 2021
Hello ! I have a similar buffet and was struggling finding a way to get rid of those grooves !! Your makeover help me so much to visualize what I could do !
However I have some questions, how did you change the locks and keys ? Because without it, the doors remain opened ? Also did you change the hinges ? Thanks !!
You did a great job :)
create and find
Wednesday 8th of December 2021
Hey there! Thanks so much for the kind words Alisson. And I definitely had some challenges with the grooves, but I am still so happy with how it turned out. I left the hinges as is. Normally I would paint them, but I didn't mind the original on this piece. And mine didn't have locks and keys. It has interior cabinet latches that make it stay closed.
Thanks again and if I can help with any ideas or the process, feel free to let me know.